")
Residence > PC Meeting
19 Step Guidelines + Full Directions for Novices (Defined in Layman’s Phrases)
Final Up to date: August 3, 2024
You’ve got spent what seems like 400 light-years researching learn how to construct a PC for the primary time, modified your thoughts on which components to make use of 267 instances, and wrestled forwards and backwards with whether or not or not it is best to simply name it a day and purchase a prebuilt gaming PC to save lots of time having to undergo the various PC meeting steps. However you ultimately mustered up the braveness and bit the bullet on ordering the proper checklist of PC components in your wants, and so they’ve lastly arrived at your door.
Wonderful alternative my pal. Whereas getting a premade PC is not the tip of the world should you do your analysis and choose an honest worth desktop from an excellent firm, there isn’t any escaping the truth that constructing your individual PC has many benefits over shopping for a prebuilt system. Total, it is effectively definitely worth the little further effort and time to learn to assemble a PC your self, and you will be glad you probably did as soon as it is throughout and your new customized PC is up and working.
After all of the build-up and limitless analysis on learn how to construct a PC, the second of reality is right here and it is FINALLY time to do the precise PC meeting steps. Feeling anxious? Worry not, Padawan, as we’re proud to current this complete but easy to grasp PC set up information. This laptop constructing tutorial will take you by the hand from absolutely the begin to end of your very first construct, with a ton of useful images and diagrams alongside the best way to make each single step as straightforward to observe together with as doable.
All through all of the PC meeting steps beneath, we’ll additionally concurrently cowl many frequent newbie questions and considerations that will pop up all through the method. So should you’re a bit confused at any stage, simply belief on this course of that is been utilized by many hundreds and hundreds of different newbie builders, and simply preserve going one step at a time at your individual tempo as a result of chances are high your considerations will likely be addressed sooner or later on this information should you merely proceed on.
Caught in PC Planning Land of Everlasting Doom? See Our Pattern Gaming PC Builds for Concepts
In the event you’d reasonably learn to assemble a PC with an in depth written information with images so to slowly undergo each step in your individual time with out having to repeatedly pause and rewind movies on YouTube (or so you possibly can print it out and have by your facet to learn from as you undergo your construct), that is the in-depth PC construct information you are on the lookout for.
Method again once I realized learn how to construct a PC for the primary time myself, I adopted a written information too as I discovered it simpler that solution to be taught all of the steps with out lacking out on little necessary particulars (that video tutorials usually brush over too rapidly or pass over altogether).
In the event you’re feeling a bit anxious about constructing a PC, there isn’t any want. It is simple to do should you merely take your time and have all of the steps layed out in entrance of you, and if I do say so myself, you are in good fingers with this set up information as it has been utilized by many different first-timers earlier than you with success.
 Really feel like this about constructing a PC? Worry not, feline – this information makes it straightforward
This walkthrough has additionally been frequently fine-tuned over the previous few years with a single purpose: make it the essentially the most useful, in-depth (but straightforward to grasp) laptop meeting tutorial round. If I am being sincere, I discover nearly all of PC set up guides on the market aren’t all that newbie-friendly and nearly at all times brush over many little particulars and necessary issues to know while you’re model new to PC {hardware}.
To be honest, most guides aren’t particularly focused for full {hardware} novices although, who crave detailed directions on each single little a part of the method, and never simply how to do a sure step however why it is best to (or should not) do it so you possibly can totally grasp and perceive the method.
Not less than that is what I wished once I realized learn how to construct a PC for the very first time, so if that is what you search in a tutorial then I am assured you may discover the directions beneath useful in your journey. I bear in mind precisely what it was wish to be a complete beginner to constructing PCs, and to usually solely turn out to be additional confused and intimidated by the written guides and movies on the market.
To today I attempt to always remember what it is like being a stone-faced beginner, and I purpose to maintain this PC constructing information as elementary primary as doable regardless of my {hardware} data and expertise growing lots over the previous few years. Wish to be spoken to as should you’ve by no means even seen the within of a PC earlier than? Let’s go.
By the best way, this gaming PC construct tutorial is written in a manner that applies to constructing any kind of PC, however we have additionally included images from 3 barely completely different construct examples to additional be certain that no one will get caught alongside the best way it doesn’t matter what set of components you are putting in. We are going to present images from a finances Intel gaming construct, a finances AMD gaming construct, and a high-end AMD construct.
1. Collect What You Have to Construct a PC
To finish the meeting of a brand new PC from begin to end, this is a listing of each single device, piece of kit, and element that you just want:
- Screwdriver/s: It is true; to construct a PC from scratch, all you want for many builds is a Phillips-head screwdriver. Particularly, you want one with a measurement #2 head, however should you’re putting in an M.2 SSD you may additionally want a measurement #1 (M.2 screws are smaller). As for the size of the screwdriver, it does not actually matter as you need to use both a brief, medium, or longer screwdriver. Utilizing a magnetic screwdriver – one that could be a magnet to screws – can also be helpful (and protected to make use of for PC constructing). See our PC constructing instruments information for extra.
- Appropriate Floor: A big, flat, exhausting, non-conductive floor to assemble your PC on reminiscent of a desk or desk (wooden or glass is ok). If the ground of the room is carpet, that is okay as long as you apply safely precautions always and also you do NOT put on socks or wool sweaters/jumpers.
- A Strategy to Floor Your self: To guard your elements being broken from static electrical energy when constructing a PC, it’s worthwhile to bodily floor your physique earlier than dealing with the inner components. You are able to do so by carrying an ESD/anti-static wrist strap/bracelet, or by periodically touching the naked (non painted) steel body of your PC case or one other steel object once in a while for a pair seconds (and particularly earlier than going to the touch an element). For instance, you possibly can contact a steel desk leg, door knob file cupboard, toaster, masonry wall (stone, brick or concrete), water pipe, gasoline pipe, steel AC, heating vent/radiator – something steel will do.
- Sufficient Time: To learn to construct your first PC from begin to end, you need to give your self loads of time as you may be (or needs to be) taking it good and gradual. Setting apart an excellent 3-4 hour block of time (minimal) is smart if you wish to set up all of your PC components in a single go, however you do not have to do it in a single sitting as long as you retain pets and any Child Yoda’s in the home effectively away out of your half-assembled system, and preserve components of their anti-static baggage till you put in them simply in case.
- Motherboard Handbook: The one guide you’ll possible must construct a PC which is useful for sure issues which can be particular to your explicit board together with the place to attach your case’s entrance panel connections and which RAM sockets to put in your reminiscence. Your case guide is a detailed second in significance (and aftermarket CPU cooler guide should you purchased one) and could also be helpful to browse over, however do not anticipate a lot instruction or steering (often solely comprises some primary diagrams). Similar goes for some other manuals your components may include (not all components have manuals) – they are not wanted to be taught PC meeting and you will find higher directions in a full PC construct information like this one.
Disclaimer: No, constructing a pc shouldn’t be exhausting should you take your time, however should you get careless ‘trigger you are in a rush besides up and play some Fortnite or Tarkov, it’s doable to break a element (and even your self, although I’ve by no means heard of that occuring so loosen up). Within the uncommon probability you trigger any kind of injury utilizing this gaming PC construct tutorial (to your {hardware} components, to your human components, or to your cat) we can’t be held accountable.
We have prudently put lots into making this PC constructing information as exact and thorough in its explanations as doable, however your construct is after all 100% your duty. From my world view this goes with out saying, however a lawyer buddy advised me I ought to embrace this for (lame) authorized functions. In different phrases, should you burn your own home down, get electrocuted and now resemble Palpatine after going through Windu in ROTS, or die, do not sue me ‘trigger this tutorial does not exist and this website is a figment of your creativeness.
2. Open Case and Put together for Set up
So, you have bought all the pieces it’s worthwhile to construct your very first PC. Now, let’s start the method. Humorous sufficient, step one to assemble a PC is to disassemble it. Properly, your case that’s. Some circumstances might solely have one detachable facet panel, however most can have two so to work from either side (the rear facet is helpful to entry for managing your cables afterward).
Go forward and take away each facet panels, or the principle facet panel no less than (often the left facet of the case). Many fashionable circumstances use thumbscrews to carry the facet panels in place, which means you possibly can simply use your fingers to undo them, however sometimes you may nonetheless want to make use of a screwdriver to initially loosen them up sufficient to the purpose the place you possibly can then use your fingers. Different circumstances will simply have customary screws that you will want to completely unscrew along with your screwdriver.
The Cooler Grasp N200 case for our Intel construct instance did want the screwdriver to open up:
 Unscrew the facet panel/s and slide them off
For our AMD construct instance utilizing the DeepCool Matrexx 30 case, it may be opened up with out the screwdriver by merely undoing the thumbscrews by hand:
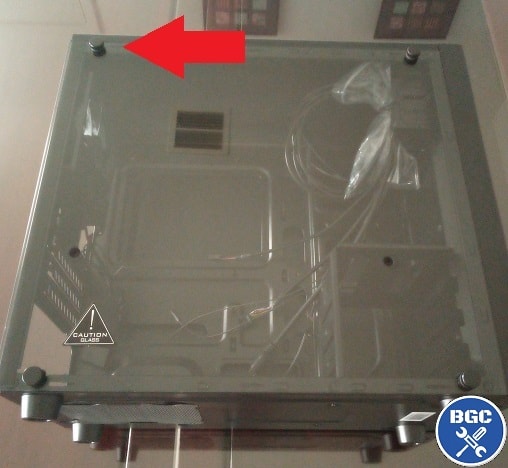 Undo the 4 thumbscrews along with your fingers in case your case has them
As soon as you have eliminated the screws on every of the 4 corners of the case, the panel ought to merely slide off. If it is a glass panel just like the one pictured above for our DeepCool Matrexx 30, watch out with it and ensure to position your case on its facet earlier than undoing the screws in order that it does not unintentionally fall off (and as soon as eliminated gently place the glass panel someplace protected the place it will not get scratched or marked).
So now that is your case opened up; yup, advised you we’re protecting it actual primary right here so no one will get left behind. Not even your Grandma, who might very effectively be in on the tangible Half Life Alyx hype of late and be assembling a excessive finish gaming PC construct to get in on the motion (respect, however I believe she’ll have a coronary heart assault when that first headcrab pounces proper at your face in freakin’ VR).
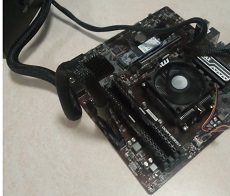
Inside your case you may discover the already hooked up entrance panel cables (pictured beneath) which we’ll connect with the motherboard afterward, pre-installed followers and their cables which additionally connect with the mobo later, and also you also needs to discover a bag of screws which you may need to open up and preserve helpful. Simply do not lose any screws and preserve all of them collectively someplace.
 Guard your entrance panel connectors from any native felines
Additionally, in case your case has a tough drive rack/caddy on the underside and you are not going to put in many exhausting drives, take into account eradicating it to unencumber room in your case. Particularly should you both have a smaller case with restricted room and/or if utilizing a non-modular (or semi-modular) energy provide that may require a good bit of room in your cables (PSU cables may be actual chunky).
The Cooler Grasp N200 Mini Tower case has a drive caddy, nevertheless it’s a smaller case and we have solely bought one storage drive for this construct (plus we’ve got a non-modular energy provide to put in for this construct which takes up extra room) so I eliminated the caddy by merely unscrewing it:
 In case your case has a storage drive rack/caddy, take into account eradicating it for extra room
3. Mount Extra Case Followers (Elective)
Nearly all of circumstances will include 1-2 followers already pre-installed inside, so there’s nothing to do for these stock-standard followers in addition to plug them into the motherboard when the time comes.
There needs to be a fan behind the case to push out heat air (referred to as an exhaust fan), and if a case comes with 2 followers then the second will possible be within the entrance to suck cool air in from exterior the case to supply airflow onto your inside elements (referred to as an consumption fan). Most circumstances will even have help for extra followers must you need to purchase some to extend airflow additional.
For our Intel construct, the Cooler Grasp N200 has two pre-installed followers, and it is a finances gaming PC construct so there isn’t any want for any greater than that.
Even should you have been utilizing extra highly effective elements than what we’re putting in right here, Greater than 2 followers is simply essential for tremendous highly effective PCs, vital overclocking, and/or aesthetic functions the place you want 3 followers or extra.
The DeepCool Matrexx 30 for our finances AMD construct solely comes with 1 fan (exhaust fan within the again), so I’ve gone forward and bought an additional 120mm fan that may go within the entrance to fortify airflow and add some cool inexperienced lighting that will likely be seen by the entrance mesh panel of this already fairly slick-looking finances case (can undoubtedly advocate this one).
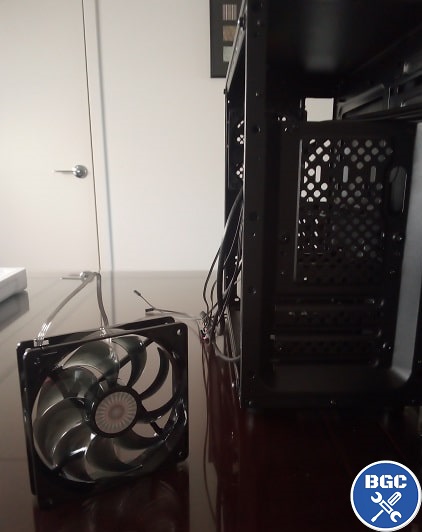
The additional fan we’ll add to the finances AMD construct
It is price mentioning that should you’re not utilizing a graphics card, and are merely utilizing the built-in graphics of a CPU just like the AMD Athlon 3000G (or the 3200G or 3400G for that matter), you possibly can get away with simply the 1 fan. Low powered methods like these actually do not want a lot airflow.
So, when you’ve got an aftermarket fan (only a fancy phrase for an additional non-stock fan) to put in, take into account doing that now in any other case it could possibly be harder to achieve in and match the fan/s later when your motherboard is contained in the case.
Full Steps: Learn how to Set up Further Case Followers
4. Put together Motherboard for Out-of-Case Set up
Now we have ready the case, there are two completely different approaches you possibly can take from right here when studying learn how to construct a PC from scratch for the primary time. You possibly can both:
- Construct PC Exterior Case: This entails putting in a few of your elements (CPU, cooler, RAM, M.2 SSD) onto the motherboard first earlier than putting in the motherboard into the case.
- Construct PC Inside Case: With this methodology you match the motherboard into the case first after which set up your elements onto it.
So what’s greatest? Must you put collectively all of your PC components exterior or contained in the case? Both can work, however the first possibility (exterior) is mostly greatest and what I would advocate for most individuals. It has extra professionals than cons in comparison with becoming the motherboard first.
Why You Ought to Set up Components Exterior the Case First
It may be harder to achieve in and set up components onto your motherboard when it is mounted inside your case. Working in your motherboard exterior the case offers you way more room to maneuver, makes it simpler to see the place to put in issues just like the CPU, and makes it simpler to firmly insert your RAM and CPU cooler (which may require a agency little push).
For instance, pushing your RAM down firmly onto the board is an entire lot simpler when it is on a flat floor; making use of an excessive amount of stress to the motherboard when it is put in within the case might flex the board an excessive amount of and injury one thing. Plus, putting in your components exterior the case means that you can rapidly examine that every one these components are working positive by quickly connecting your PSU to the motherboard (we’ll get to that later).
You possibly can set up the graphics card onto the motherboard exterior the case too, to incorporate that in your fast element take a look at, however you may need to take away the GPU earlier than putting in the motherboard into the case (and set up the GPU after). Don’t fret should you’re confused, as all will turn out to be clear.
* Security Reminder *
Earlier than touching your motherboard, or some other element for that matter, do not forget that it’s worthwhile to floor your bodily physique first to take away any static electrical energy build-up.
In the event you’re not carrying an anti-static strap, you are able to do this by touching a steel floor/object such because the steel body of your case for a pair seconds (refer again to step 1 for extra on this).
So, let’s go forward and put together your motherboard. Fastidiously take away your motherboard from the anti-static bag it got here with, and holding the board by its edges, place it on high of your motherboard field (or in your desk if you do not have the field).
 Fastidiously place motherboard on its cardboard field or your desk
You need to maintain the motherboard by its edges and/or the large steel connectors (for the rear USB ports and so on) – keep away from touching any uncovered circuitry on the highest or backside of the board.
Motherboards and different components may be fairly sturdy generally, however unintentionally bending a pin and even getting oil out of your pores and skin on there might injury one thing.
Simply take precaution with all of your components and thoroughly observe all directions all through this carefully-written walkthrough and you will be positive, advert all you actually need to recollect is to carry elements by their edges or steel backplates, and do not contact something you are not sure about.
Sitting a motherboard on its cardboard field reasonably than immediately in your desk makes it rather less inclined to break, and likewise makes it a bit extra secure to work with and fewer prone to transfer round after we set up components onto it (and fewer threat of scratching/damaging the underside of the board).
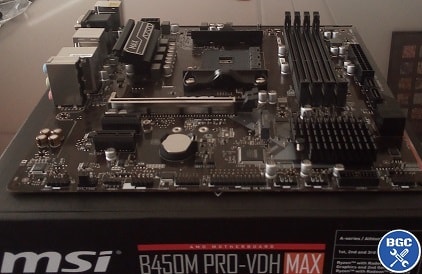 Our finances AMD construct instance able to go
Further Security Tip
Don’t sit your motherboard on high of the anti-static bag it got here with, as the skin of the bag shouldn’t be assured to be a protected floor to work on.
There’s differing opinions on this in laptop science circles, however simply use the motherboard field as a substitute to be on the protected facet.
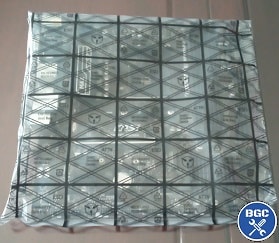 The within of the bag safely protects the board, however the exterior is a questionable floor to make use of
5. Insert Processor Onto Motherboard
It is time to set up the brand new brains of your battlestation onto your motherboard, which deserves its personal separate web page to clarify all of the steps in addition to solutions to frequent questions on CPU installs.
If I included this whole gaming PC construct tutorial on a single web page it will be too lengthy, so every step of the method is in its personal information.
So while you’re prepared, head over to the CPU set up part that may present you learn how to set up an Intel or AMD processor:
Full Steps: Learn how to Set up a CPU Step by Step
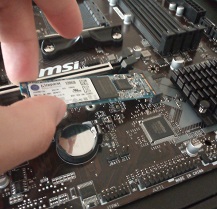
6. Mount Heatsink and Fan On Motherboard
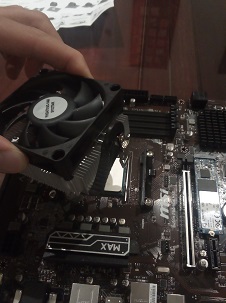
Now it is time to connect the CPU cooler (technically referred to as a HSF: Heatsink and Fan) which can sit on high of your CPU to maintain it cool. We’ll be showcasing learn how to set up a stock-standard Intel or AMD cooler (together with 2 completely different AMD cooler variations for finances and high-end AMD inventory coolers), which in different phrases is the cooler that comes included with Intel or AMD processors.
However we even have guides on putting in widespread aftermarket / third-party coolers too. Shopping for and utilizing an aftermarket cooler is not essential because the inventory coolers are simply positive should you’re not overclocking the CPU, however they do present higher cooling and noise discount in comparison with stock-standard AMD/Intel fashions.
Full Steps:
Learn how to Set up a Inventory AMD Cooler (Wraith Stealth)
Learn how to Set up Excessive-Finish AMD Cooler (Wraith Prism RGB)
Learn how to Set up a Inventory Intel Cooler (LGA 1700)
Learn how to Set up the Cooler Grasp Hyper 212 Sequence
Learn how to Set up the Noctua NH-D15 Sequence
7. Insert Reminiscence Into Motherboard
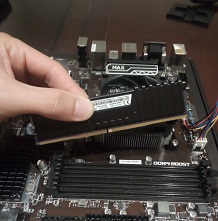
Becoming your reminiscence modules is without doubt one of the best, quickest components to put in when assembling a pc, however there are some issues to know together with which particular reminiscence slots on the motherboard to put in them in (technically referred to as DIMM slots, brief for Twin In-Line Reminiscence Module).
In the event you deliberate a sensible PC components checklist, you may have gotten 2 reminiscence modules in your PC construct as a substitute of simply the 1 with a view to take benefit of the efficiency advantages of working twin channel reminiscence. Although should you’re on an actual tight finances, a single module is not the tip of the world.
In the event you have been additionally sensible about selecting your motherboard, and bought one which has 4 reminiscence slots so you possibly can have 2 slots free for a future improve, the query is which 2 slots do you utilize now? It does matter, so head over to our full RAM information for all the main points and set up steps.
Full Steps: Learn how to Set up RAM Step by Step
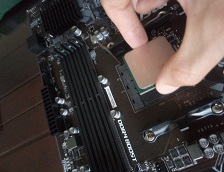
8. Insert M.2 SSD Onto Motherboard (Elective)
In case you have an M.2 SSD to put in, you may additionally need to try this now (and even earlier than the CPU if you would like) whereas your motherboard is chilling exterior the case as a result of as talked about you might have all of the area on this planet to simply work inside your motherboard. Plus, M.2 screws are smaller than common laptop screws and it may be irritating should you lose it within the deep darkish depths of your case.
M.2 SSDs are the thin-style SSDs that plug immediately into your motherboard (and are powered by it; no PSU connection required), versus common 2.5 inch SSDs that are put in individually to the motherboard (in drive bays; defined later). For all of the steps see our M.2 information.
Full Steps: Learn how to Set up an M.2 SSD Onto Motherboard
9. Shortly Take a look at Core Elements (Elective)
That is one other technically elective step when studying learn how to construct a PC from scratch, however it’s thought of good apply and may be price it within the occasion you get unfortunate and find yourself having a element that is defective or DOA (Useless on Arrival). It is one thing I like to recommend to most first-time builders, nonetheless be happy to skip this step should you’re feeling assured and simply need to end your construct sooner reasonably than later.
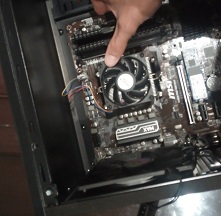
Doing a fast examine that the components you have put in to this point are all working is simple, and simply requires you to quickly plug within the PSU and jump-start the motherboard along with your screwdriver, and it will possibly prevent time down the highway as a result of it is tougher to do troubleshooting (or uninstall one thing) when all the pieces is already fitted within the case.
Oh, and also you may need to quickly set up your GPU for the take a look at too, after which take away it to have the ability to mount your motherboard within the case (in any other case the GPU would get in the best way). All is defined in our exterior take a look at information so head on over should you do need to give your components a fast examine for indicators of life, which additionally explains learn how to rapidly examine your CPU temperature within the BIOS whilst you’re at it (to substantiate your CPU, cooler, and paste are all put in correctly).
Full Steps: Learn how to Take a look at PC Components Exterior Case Earlier than Constructing
10. Mount Motherboard Into Case
As soon as you have completed putting in the CPU, cooler, and RAM (plus M.2 SSD when you’ve got one), and you have carried out a fast exterior take a look at to be on the protected facet, it is lastly time to decrease your mothership into the deep darkish depths of your case.
This primary requires you to suit the motherboard backplate and set up the case standoffs (screws that create a spot between the case and motherboard). Then it is a matter of rigorously decreasing the board in to first match up with the backplate, after which onto the standoffs. Lastly, you screw within the board to safe it.
After this key step of PC meeting, your development will actually beginning to take type. For full steps and images, plus an FAQ about standoffs and backplates (they are often annoying), do not miss our complete newbie’s information.
Full Steps: Learn how to Set up a Motherboard Right into a PC (& Match Standoffs)
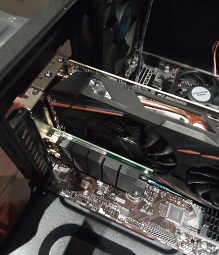
11. Mount GPU and Different PCIe Playing cards
Technically talking, that is one more elective step when studying learn how to construct a PC as a few of you’re going to be constructing an APU gaming PC with out a graphics card (in different phrases, utilizing the CPU’s built-in graphics; shoutout to fellow low-spec avid gamers as I do know what it is wish to need to roll that manner my entire life till solely only in the near past).
However for most individuals assembling a gaming PC, chances are high you may have a graphics card to put in. It is simple to do however take a look at our full step-by-step information as there are some things concerned together with utilizing the correct PCIe slot on bigger motherboards which have multiple full-length PCIe slot (spoiler; it is nearly at all times the highest slot), eradicating the proper rear steel bracket in your case, securing the cardboard with screws, and connecting it to the PSU (when your PSU is put in although).
You may also produce other PCIe (PCI Specific) playing cards to put in reminiscent of a wi-fi desktop adapter card for WiFi or a sound card for audio manufacturing functions, so now’s nearly as good a time as any to get that carried out.
Full Steps:
Learn how to Set up a Graphics Card
Learn how to Set up a Wi-fi Community Card
Learn how to Set up a Sound Card
12. Mount SSD/HDD In Case (Elective)
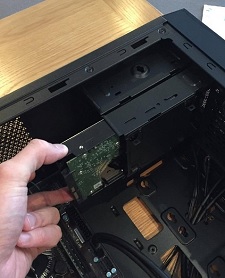
Earlier we went over putting in M.2 SSDs that reside snugly in your motherboard, however for all different regular-sized SSDs and HDDs (2.5 and three.5 inches respectively) you may want to suit them inside your case someplace. Precisely the place they go will rely in your particular case, however they’re going to usually be slotted right into a drive bay.
As soon as you have discovered a house in your drive/s, you additionally want to attach them to your motherboard utilizing a SATA information switch cable (that ought to have been supplied in your motherboard field). You additionally must plug them immediately into your PSU (utilizing your PSU’s SATA energy connector; to not be confused with the SATA information cable).
We’ll clarify the cable connections afterward on this information after we have put in the PSU into the case (together with recommendations on cable administration), however for the bodily set up of your HDD or SSD see our devoted information should you want full element and images.
Full Steps: Learn how to Set up a SSD or HDD in Case
13. Mount Optical Drive in Case (Elective)
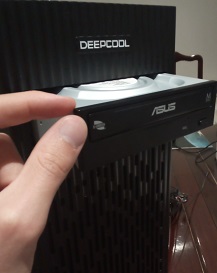
As soon as a necessary a part of assembling a pc, optical drives (DVD, CD, and/or Blu-ray drives) have gotten more and more much less necessary and fewer used because the digital age continues and bodily media dies its inevitable gradual dying. Nevertheless it’s undoubtedly not utterly lifeless, and there is lots of people who nonetheless embrace them of their PC builds for enjoying older video games, watching bodily films, or burning discs.
So if it’s worthwhile to set up one, it is a easy means of eradicating your case entrance panel, sliding it by a 5.25″ drive bay, securing the drive to the case with screws, and lastly connecting a SATA information and SATA energy cable to the motherboard and PSU respectively (oh, and popping in any driver/app CDs you acquired with the drive after you have put in your working system).
Full Steps: Learn how to Set up a Optical Drive in Your PC Case
14. Join Case Entrance-Panel Cables
Your case has a variety of options on the entrance reminiscent of USB ports, energy on button, reset button, headphone jack, mic jack, and so on. These have to be plugged in to the proper connections on the motherboard (technically referred to as motherboard headers), however precisely the place they plug in on the motherboard will fluctuate from board to board so you may need to seek the advice of your motherboard guide after which dive into the steps.
You in all probability need to do that earlier than putting in the ability provide within the case (the following upcoming step) – particularly in smaller circumstances. Having the ability provide already put in in your case can typically make reaching and connecting the entrance panel connections to your motherboard a bit tougher, as a result of these ports are on the underside of your motherboard and the highest of your energy provide may get in the best way.
Full Steps: Learn how to Join Entrance Panel to a Motherboard
15. Mount Energy Provide In Case
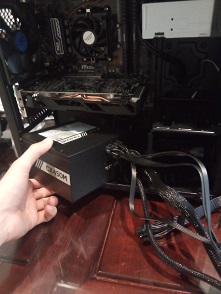
Bodily becoming the PSU into your laptop case is one other fast and straightforward a part of studying learn how to construct a PC, however as with most PC meeting steps there’s at all times a couple of little issues to know and potential questions you may need as a first-timer. For instance, you may surprise which manner the ability provide fan ought to face; a terrific query. We break all of it down within the information.
Full Steps: Learn how to Set up a Energy Provide (& Which Strategy to Mount)
16. Join Energy Provide to Elements
After you have bodily mounted the PSU, all that is left is connecting the cables to numerous components of your system and doing a bit primary administration of your cables to maintain issues good and neat:
Full Steps: Learn how to Join Energy Provide Cables (& Cable Administration 101)
17. Final Checks and Booting Your PC
We’re carried out masking all of the bodily set up steps of learn how to assemble a PC, however earlier than you begin up your machine for the primary time there’s a couple of further steps and checks:
Full Steps: Booting Your New PC for the First Time (Guidelines Earlier than Beginning PC)
Have hassle with booting up? No must freak out, because it’s often one thing easy, and we have got your again:
Troubleshooting: Learn how to Troubleshoot a New PC Construct (What to Do if PC Does not Flip On)
18. Setup BIOS, Set up OS, Replace Drivers
As soon as your new laptop is lastly totally operational, there’s nonetheless a couple of extra issues to do together with getting into the BIOS and checking/altering a pair issues, and putting in software program like your working system and different applications. Get the entire lowdown right here:
Full Steps: What to Do After Constructing a PC (BIOS and Software program Setup)
19. Sport in All-New Graphical Glory
In the event you’ve learn this far, and carried out all of the steps – congrats! Welcome to the fantastic world of DIY PC. Time to have fun a bit in whichever manner you wish to roll, after which proceed to load up your sport of option to do what you do greatest. Or should you’re like me and barely have time for a gaming sesh as of late, get straight again to work – though in a (hopefully) a lot quicker, productive and load-free method.
I hope this complete information has helped you learn to construct a PC extra simply. After going by all of the PC set up steps and constructing your first PC from scratch, you now have the data, talent and confidence to simply construct computer systems – for all times! As soon as a builder, at all times a builder, and now you have seen behind the scenes so to talk, and the way rewarding planning and assembling your individual laptop is, there isn’t any going again to prebuilt PC land of doom.
 Began on the mobo now we’re right here ♪
In case you have any suggestions on this information, or questions on learn how to assemble a PC, depart a touch upon the greatest gaming PC builds web page. In the event you actually discovered this information useful in your journey, I additionally settle for suggestions within the type of espresso. Get pleasure from your new system, and should you’ve made it this far – effectively carried out! You could have my respect. Joyful gaming and dealing.
Trusted VPN
VPN software program may be necessary at the present time, particularly should you do plenty of on-line banking and/or use public WiFi while travelling. Having a VPN provides an additional layer of safety to your PC or laptop computer to assist shield your particulars reminiscent of financials, banking exercise, and so on. There are additionally advantages to utilizing VPNs for gaming.
As a result of they’re so widespread as of late, there are numerous VPN suppliers, and it may be complicated to select one. If you need my 2 cents, after numerous analysis I made a decision on NordVPN ‘trigger it is one of many quickest, most dependable VPNs for each gaming and normal use, with numerous credible critiques on the market backing that up. In addition they very often run very strong offers.
Fashionable Articles
Search the Website
In regards to the Creator
Indie dev at present engaged on my first public launch after tinkering as a programmer and sport designer over time with interest initiatives. Writing and updating the articles on this website helps a bit with self-funding the sport, and I hope the location helps prevent cash or frustration when constructing a brand new PC. If you wish to help the work I do, sharing an article on socials or Reddit does assist out, and is way appreciated. I additionally settle for suggestions, however please don’t tip until this website has helped you considerably.
My fav video games of all time are OOT, Excellent Darkish, MGS1, MGS2, GE007, DKC2, THPS3, Halo, HL1, and HL2, with the newest addition to my checklist of immortals being the VR masterpiece Alyx. For anybody who owns a VR headset, you’ll find out about my upcoming sport right here the place I will likely be sharing the upcoming announcement trailer as quickly as I am proud of the extent of high quality of the sport to have the ability to share it with the world.

")


